No-Bake Pumpkin Cheesecake With a Toasted Oat Crust
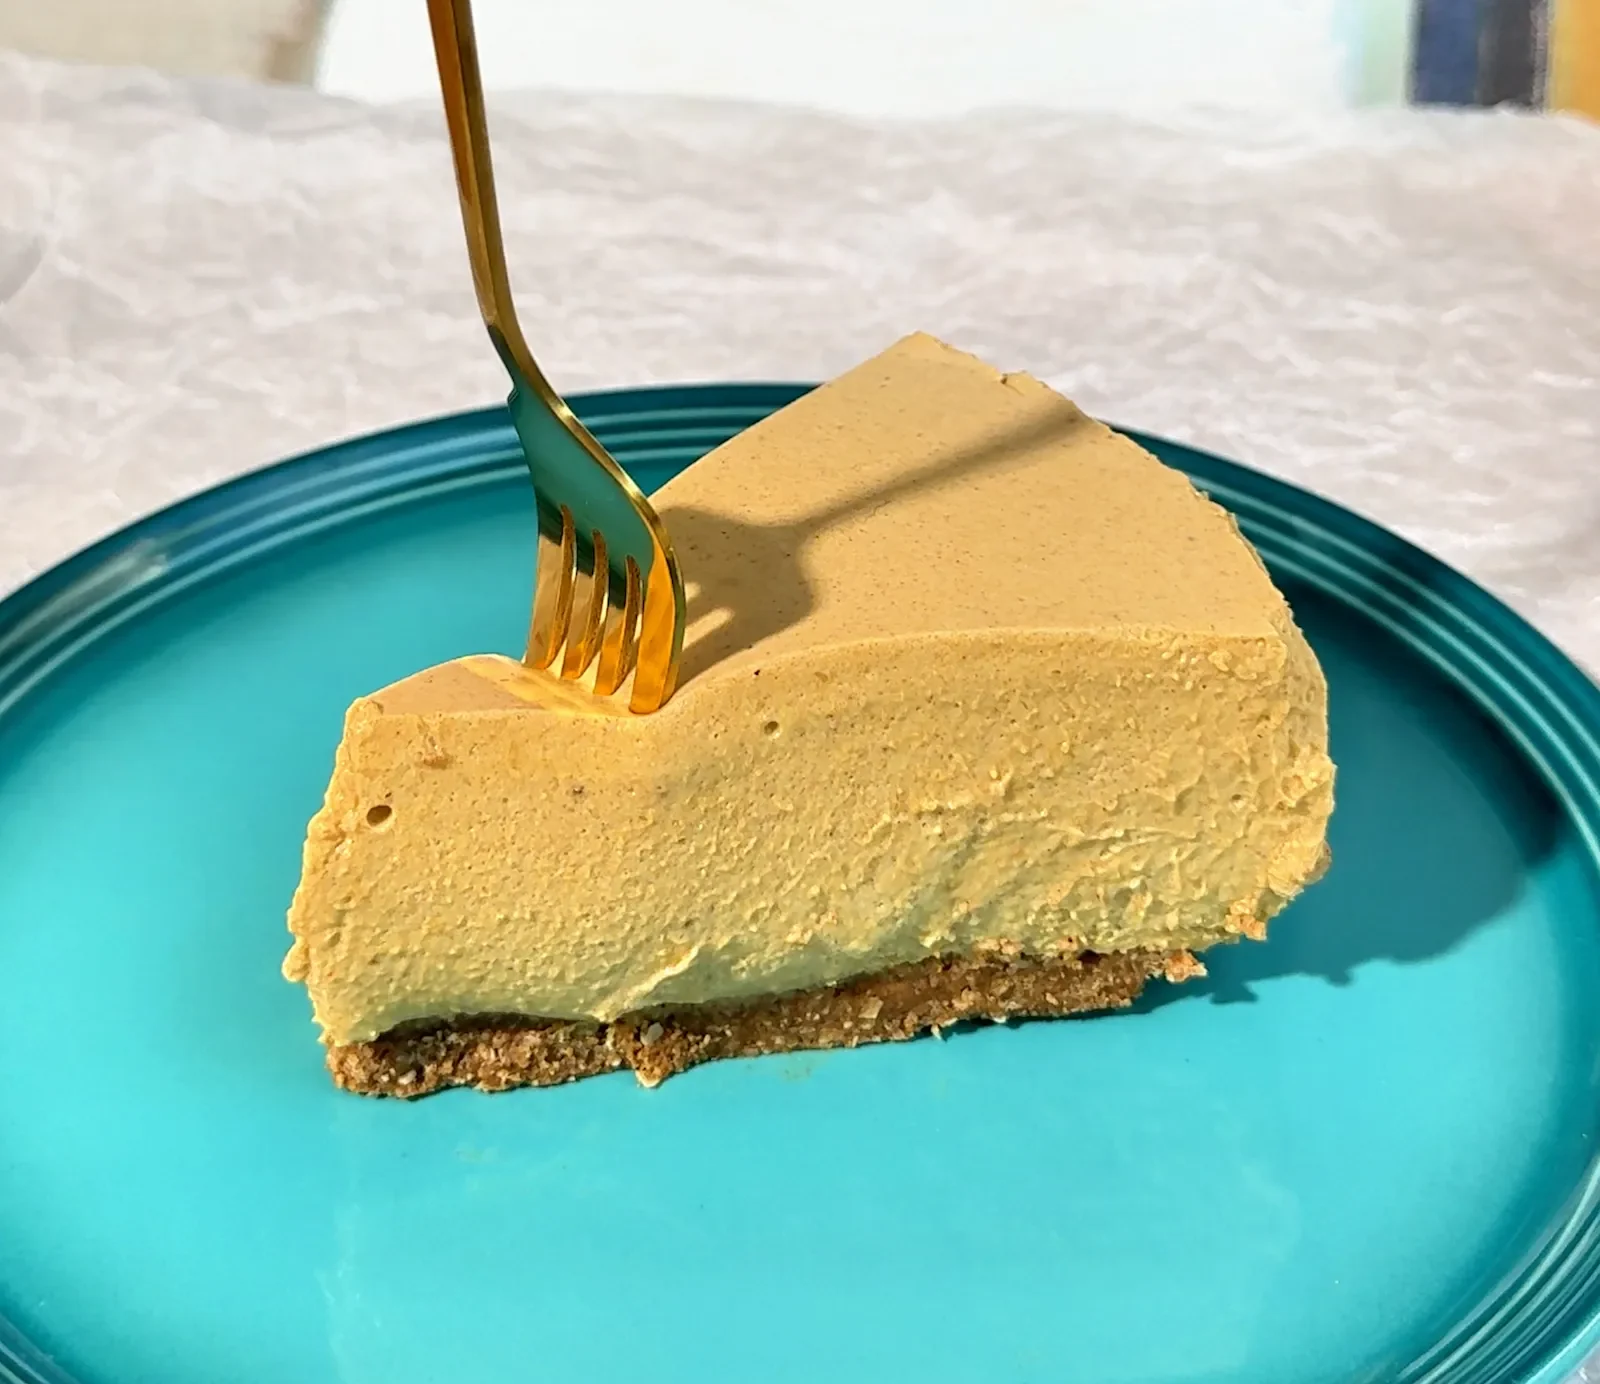
This is what happens when a no-bake cheesecake meets a really thick pumpkin puree: creamy, a gorgeous deep orange, and warm with cinnamon in a way that tastes exactly like fall. Think of it as somewhere between a no-bake pumpkin pie and a classic cheesecake.
It never goes in the oven. It sets in the fridge with gelatin, which means no water bath, no cracks, and no cheesecake sinking in the middle.
And unlike most no-bake cheesecakes, it is made with real whipped cream. No Cool Whip, no sweetened condensed milk. That is exactly why we use a little gelatin: it is what lets this cheesecake stand 2½ inches tall and slice clean instead of slumping on the plate.
What really decides the result is how thick your pumpkin puree is. We explain it in detail below, because it is 80% of the recipe and almost nobody talks about it.
It makes one 9-inch cheesecake, 2½ inches tall. That is twelve generous slices, and it keeps for three days in the fridge, if it lasts that long.
How We Make It at Home, Step by Step
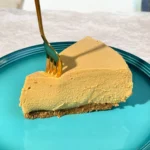
No-Bake Pumpkin Cheesecake
Equipment
- 9-inch (22 cm) springform pan At least 2½ in (6 cm) tall
- Parchment paper or acetate strip To line the bottom and sides
- Hand or stand mixer You can do it by hand, but it is work
- Silicone spatula For folding in the cream
- Large skillet To toast the oat flour
- Kitchen scale
- Instant-read thermometer Optional, for the 35 °C (95 °F) butter
Ingredients
Crust
- 180 g oat flour 2 cups. Or finely ground rolled oats. Use certified gluten-free oats for a gluten-free crust
- 115 g unsalted butter ½ cup. (1 stick) Melted and cooled to about 35 °C (95 °F)
- 50 g granulated sugar or panela ¼ cup. If using panela, sift it
- 5 g ground cinnamon 2 tsp
- 1 g salt A scant ¼ tsp
Filling
- 600 g full-fat block cream cheese 21 oz (about 2⅔ blocks of 8 oz). Like Philadelphia. At room temperature, about 20 °C (68 °F)
- 500 g thick pumpkin puree 2 cups: one 15 oz can plus about ⅓ cup. 100% pure pumpkin, not pie filling. Fridge cold
- 300 g heavy cream 1¼ cups. Very cold
- 100 g granulated sugar or panela ½ cup. If using panela, sift it
- 75 g cold water 5 tbsp. To bloom the gelatin
- 14 g unflavored powdered gelatin ½ oz, about 4½ tsp. That is 2 envelopes of 7 g each
- 8 g ground cinnamon 1 tbsp
- 8 g vanilla extract 2 tsp. Optional
- 3 g salt ½ tsp
- 2 g ground ginger 1 tsp. Optional
- 1 g ground nutmeg ½ tsp. Optional
- 1 g ground cloves ½ tsp. Optional
- 0.7 g ground turmeric ¼ tsp. Optional, for color only
Instructions
Prep
- Soften the cream cheese. Take the 600 g (21 oz) of cream cheese out of the fridge at least an hour ahead, until it reaches about 20 °C (68 °F). The heavy cream stays in the fridge until the last moment.
- Line the pan. A circle of parchment paper on the bottom and a strip of parchment or acetate along the side, taller than the rim.
- Have the puree ready and cold. 500 g (2 cups) of thick pumpkin puree, from a can or homemade. If you use canned, make sure it says 100% pure pumpkin, not pumpkin pie filling.
Crust
- Toast the oat flour. Wide, dry skillet, no oil, medium low heat. Add the 180 g (2 cups) of oat flour and stir constantly for 5 to 10 minutes, until it smells like cookies and turns a light golden color. Because it is a powder, it goes from toasted to burnt in seconds, so do not walk away. If your skillet is small, do it in two batches of 90 g (1 cup). Let it cool.
- Melt the butter. 40 to 50 seconds in the microwave, then let it cool to about 35 °C (95 °F): warm to the touch, not hot.
- Mix the crust. Combine the cooled oat flour, 50 g (¼ cup) of sugar, 5 g (2 tsp) of cinnamon, and 1 g (a scant ¼ tsp) of salt. Pour in the butter and mix with a fork until it looks like wet sand: squeeze a handful in your fist and it should hold together when you open your hand.
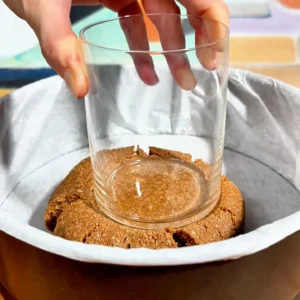
- Press and freeze. Tip it into the pan and spread it with your fingers or the flat bottom of a glass, pressing firmly. Pay extra attention to the edges, which is where it always ends up loose. Into the freezer while you make the filling.

Filling
- Bloom the gelatin. Put the 75 g (5 tbsp) of cold water in a small bowl and sprinkle the 14 g (½ oz, 2 envelopes) of unflavored gelatin evenly over the top. Leave it untouched for 10 minutes, until it looks like a firm sponge.
- Beat the cream cheese. In a large bowl, beat the 600 g (21 oz) of cream cheese with a mixer on medium speed for 1 to 2 minutes, until smooth and glossy.
- Add the sugar. Add the 100 g (½ cup) of sugar in two batches, beating 30 seconds after each, until there are no lumps.
- Pumpkin and spices. Add the 500 g (2 cups) of cold puree, 8 g (1 tbsp) of cinnamon, 3 g (½ tsp) of salt, and, if using, the vanilla, ginger, nutmeg, cloves, and turmeric. Mix the turmeric with the other spices in a small bowl first, or it will leave yellow specks. Beat on low only until the color is even, 40 to 50 seconds, no more.
- Whip the cream very lightly. Whip the 300 g (1¼ cups) of heavy cream only until it falls from the beaters in a slightly thick ribbon. Here it is better to under-whip than over-whip: at stiff peaks it breaks when you fold it in and leaves lumps of butter.
- Melt and temper the gelatin. Melt the bloomed gelatin for 12 to 15 seconds in the microwave, or over a water bath while stirring, until liquid and clear. Do not let it boil: above 80 °C (175 °F) it loses its setting power. Stir 3 tablespoons of the pumpkin filling into the gelatin bowl quickly, to even out the temperatures.
- Add it without stopping. Pour the tempered mixture into the filling and beat on low for 20 seconds, without pausing to do anything else: the gelatin starts to set as soon as it touches the cold filling.
- Fold in the cream. With a silicone spatula, gently: down through the middle, across the bottom, up the side, and give the bowl a quarter turn. Repeat until you see no white streaks, and stop there.
Chill
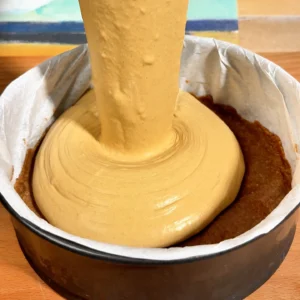
- Fill the pan. Take the pan out of the freezer and pour the filling over the crust. Tap the pan on the counter 4 or 5 times to bring up any air bubbles.
- Into the fridge. Leave it uncovered for the first 30 minutes, or condensation will form on the surface. Then cover it with foil or a plate, without touching the filling. At least 6 hours, ideally overnight.
- Check that it is set. It is ready when you gently shake the pan and the center wobbles slightly as one piece, without rippling. If your finger leaves a dent, it needs more time.
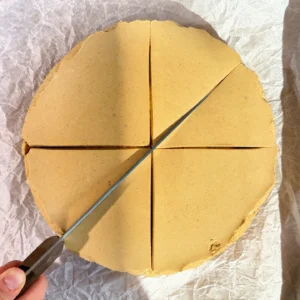
- Unmold and slice. Carefully. For clean slices: a hot knife, wiped dry, cutting straight down without sawing, and wiping the knife between slices.
Notes
- Canned pumpkin: one standard 15 oz can is 425 g, so you will need one can plus about ⅓ cup from a second. It must be 100% pure pumpkin, not pumpkin pie filling.
- Homemade puree: no need to peel the pumpkin. Roast it in halves, scoop out the flesh, blend, strain, and cook down in a skillet. A 1.5 kg (3.3 lb) pumpkin gives you about 650 g, enough for this cheesecake with some left over. Full method in our homemade pumpkin puree guide. Add about two and a half hours, including cooling: it has to go in fridge cold, so it is easiest to make the day before.
- The optional ginger, nutmeg, and cloves can be replaced with 2 tsp of pumpkin pie spice.
- For a gluten-free cheesecake, use certified gluten-free oat flour.
- Keeps 3 days in the fridge, covered.
Any questions about the recipe? Ask us in the comments and we’ll get back to you. And if you make it, tell us how it turned out, we love hearing from you! 🤗
Why This No-Bake Cheesecake Actually Slices
Most no-bake cheesecakes rely on Cool Whip or sweetened condensed milk to hold together, and they end up soft: fine in a cup, not so great as a tall slice. Add pumpkin, which is mostly water, and they get softer still. This one is built differently, and three things make it work.
Thick Puree Is 80% of the Result
This is where the cheesecake is won or lost, and the part that took us the longest to get right.
Pumpkin is water. When that water ends up in the filling, the gelatin has to set far more liquid than it was meant to, and you get a cheesecake that holds its shape but feels jiggly and gelatinous instead of creamy. If there is a lot of extra water, the center simply does not set.
Canned pumpkin puree is usually thick enough to use straight from the can. If you make it from scratch, it has to be cooked down until it is genuinely thick: when you drag a spatula across the bottom of the skillet, the trail should take a second to close.
Whip the Cream Less Than You Think
The 300 g of heavy cream gets whipped very lightly. Just until it falls from the beaters in a slightly thick ribbon. No stiff peaks.
It sounds wrong, but it is the other way around. Cream whipped to stiff peaks has so much structure that it will not blend in: folded into a cold, dense filling, it breaks, the fat separates, and you get little lumps of butter throughout the cheesecake. You see them when you slice, and you feel them when you eat it.
The rule is easy to remember: with this recipe, it is always better to under-whip than over-whip. Lightly whipped cream folds in perfectly, and the cheesecake stays just as airy, because most of the air comes from beating the cream cheese.
Gelatin, Without the Drama
Gelatin makes people nervous for two reasons, and both have a simple fix.
First, heat. Above 80 °C (175 °F), gelatin loses its setting power, so melt it gently: 12 to 15 seconds in the microwave, or over a water bath while stirring. It should be liquid and clear, and it should never boil.
Second, temperature shock. If you pour hot, melted gelatin straight into a cold filling, it sets on contact and leaves rubbery strands that never dissolve. The fix takes one second: stir 3 tablespoons of the pumpkin filling into the gelatin bowl first. That evens out the temperatures, and then the whole mixture can go in safely.
Once the gelatin touches the filling, do not stop. Beat for 20 seconds on low and keep going. This is not the moment to answer a text.
And make sure it is unflavored gelatin. Jell-O and other flavored gelatins already contain sugar, color, and flavor, and they will not work here.
Canned or Homemade Pumpkin Puree
You need 500 g (2 cups) of thick, fridge-cold pumpkin puree. Cold matters: warm puree softens the cream cheese and the gelatin starts working too early.
Canned is the easy way, and it keeps this recipe completely oven-free. A standard 15 oz can holds 425 g, so you will need one can plus about ⅓ cup from a second one. Save the rest for a latte or a smoothie.
One thing to check on the label: it has to say 100% pure pumpkin. Right next to it on the shelf there is usually “pumpkin pie filling”, which already has sugar and spices added, and it will ruin this cheesecake.
Homemade is better, if you have the time. It is thicker, it tastes like actual roasted pumpkin, and you do not even need to peel the pumpkin. You roast it in halves, scoop out the flesh, strain it, and cook it down in a skillet. One batch from a 1.5 kg (3.3 lb) pumpkin gives you about 650 g, which covers this cheesecake with some to spare. Full method in our guide to homemade pumpkin puree.
That one does use the oven, to roast the pumpkin. The cheesecake itself never does.
Which Cream Cheese to Use
Full-fat block cream cheese, like Philadelphia. You need 600 g (21 oz), which is about 2⅔ of the standard 8 oz blocks. Take it out of the fridge well ahead: with that much, give it a good hour to reach about 20 °C (68 °F). Cold cream cheese will not beat smooth, and it leaves lumps that never go away.
Store brands work just as well, and we use them often. The only real difference between brands is water content, and in a recipe with gelatin that barely shows.
What does not work:
- Spreadable cream cheese in a tub. It is whipped and softer, with more water, and the filling comes out loose.
- Reduced-fat or fat-free. It releases water when beaten, and the cheesecake loses exactly what makes it creamy.
- Mascarpone on its own. Too rich for a cheesecake this size. Half and half with cream cheese is lovely, though.
If you love cream cheese and cinnamon together, our homemade cinnamon rolls with cream cheese frosting are the other recipe we make every fall.
The Toasted Oat Crust
This crust has no graham crackers. It is made with oat flour toasted in a skillet, and it is our favorite part of the recipe.
Toasting the oat flour changes everything. Raw, oat flour tastes like raw oats, a little floury in a dessert. Toasted, it smells and tastes like a freshly baked cookie. It takes five to ten minutes in a wide, dry skillet with no oil, over medium low heat, stirring constantly. Because it is a powder, it goes from toasted to burnt in seconds, so do not walk away, not even to check your phone. It is ready when it smells like cookies and turns a light golden color. If your skillet is small, do it in two batches of 90 g (1 cup).
Let it cool before adding the butter. If it is still hot, the butter separates.
The texture you want is wet sand: squeeze a handful in your fist, and it should hold together when you open your hand. If it crumbles, it needs more butter or the butter was too cold.
When you press it into the pan, pay extra attention to the edges, which is where it always ends up loose. We use the flat bottom of a glass and press hard. Then into the freezer, so it firms up while you make the filling.
Melt the butter and let it cool to about 35 °C (95 °F), warm to the touch but not hot. If it is too hot, it cooks the flour and the crust turns greasy.
A bonus: this crust can be gluten-free. Use certified gluten-free oat flour, and the whole cheesecake is gluten-free, which a graham cracker crust can never be.
Other Crust Options: Graham Cracker, Gingersnap, or Oreo
The oat crust is what we make, but the filling works on any classic crust. The swap is the same for all three:
Replace the 180 g (2 cups) of toasted oat flour with 200 g of cookie crumbs, and keep the 115 g (½ cup) of butter. You can reduce or skip the sugar, since the cookies are already sweet. Everything else stays the same, including the trip to the freezer.
- Graham cracker crust. The classic American cheesecake crust. About 200 g is roughly 1¾ cups of crumbs.
- Gingersnap crust. Our pick if you are skipping the oats. The ginger plays beautifully with the pumpkin and the spices.
- Oreo crust. Dark, dramatic, and a great contrast with the orange. If you want to go all in, try it with our homemade Oreos.
You lose the toasted flavor, which for us is one of the best things about this cheesecake, but they are all perfectly good options.
The Spices (or Just Use Pumpkin Pie Spice)
Cinnamon is the one that is not optional: 8 g (1 tbsp) in the filling and 5 g (2 tsp) in the crust. It is what makes this taste like fall instead of just orange cheesecake.
The rest are optional, and they lift the whole thing:
| Spice | Amount | What it adds |
|---|---|---|
| Ground ginger | 2 g (1 tsp) | A little warmth in the background that cuts the sweetness |
| Ground nutmeg | 1 g (½ tsp) | The most “bakery” flavor of the bunch |
| Ground cloves | 1 g (½ tsp) | Very strong, 1 g is plenty |
| Ground turmeric | 0.7 g (¼ tsp) | Color only, no flavor at this amount |
If you have pumpkin pie spice in the pantry, you already have these. Ginger, nutmeg, and cloves are exactly what goes into it. Replace the three of them with 2 tsp of pumpkin pie spice and keep the cinnamon as it is.
One important trick with the turmeric: mix it with the other spices in a small bowl first. Sprinkled straight onto the filling, it leaves little yellow specks that never blend in.
Vanilla extract is optional too, 8 g (2 tsp). It rounds things out, but you will not miss it if you do not have any.
How to Tell It Is Set, and How to Slice It
Six hours in the fridge is the minimum. Overnight is what we do, and what we recommend: the center takes much longer than the edges.
Leave it uncovered for the first 30 minutes. If you cover it right away, condensation forms and drips onto the surface. After that, cover it with foil or a plate, without letting it touch the filling.
It is ready when you gently shake the pan and the center wobbles slightly as one piece, without rippling. If you touch it and your finger leaves a dent, it needs more time. Put it back and do not fight it.
To slice it like the photos: use a knife that is very hot, wipe it dry, and cut straight down in one clean motion. Wipe the knife between slices. At 2½ inches tall, the difference between doing this and not doing it is huge.
A Make-Ahead Thanksgiving Dessert
If you are hosting, this might be the most useful dessert you can make.
It does not need the oven, which on Thanksgiving is busy with everything else. It actually has to be made ahead, because it needs a night in the fridge. And it keeps well for three days, so you can make it on Tuesday or Wednesday and have one thing fully done before the big day.
To take it somewhere, leave it in the springform pan and unmold it when you arrive. It travels much better that way.
Four Mistakes That Ruin This Cheesecake
- Watery puree. The number one mistake, by far. A gelatinous cheesecake, or one that is liquid in the middle. It gets fixed before, not after: use thick canned puree or cook homemade down properly.
- Over-whipped cream. Little lumps of butter throughout the filling. Whip it less than you think.
- Hot gelatin poured straight into cold filling. Rubbery strands that never dissolve. Always temper it first with 3 tablespoons of filling.
- Slicing it too soon. Before six hours, the center cannot hold a slice and it spreads out on the plate. This recipe gets planned the day before.
How to Store It
In the fridge, covered, with nothing touching the surface, it keeps well for three days, and up to four with a slightly firmer texture.
The surface dries out a little from the second day. If you are making it ahead, cover it well from the start (after those first 30 minutes uncovered) and slice it right before serving.
Freezing is covered in the FAQ below.
No-Bake Pumpkin Cheesecake FAQ
Can I use canned pumpkin?
Yes, and it is the easiest option. It keeps the whole recipe oven-free. Make sure the label says 100% pure pumpkin, with nothing else added. A standard 15 oz can holds 425 g, so you will need one can plus about ⅓ cup from a second one to reach the 500 g.
Can I use pumpkin pie filling instead of pumpkin puree?
No. Canned pumpkin pie filling already has sugar and spices added, so the cheesecake would come out far too sweet and the spices would be doubled up. It sits right next to pure pumpkin on the shelf and the cans look almost the same, so check the label: the ingredient list should say only pumpkin.
Can I make it without gelatin?
We would not recommend it with this recipe. Pumpkin puree adds a lot of water, and without gelatin the filling would not hold a clean slice at this height. No-bake cheesecakes without gelatin usually rely on Cool Whip or condensed milk to stay together, and they come out much softer. We have not tried agar-agar here: it needs to be boiled and sets much firmer, so the texture would be quite different.
Can I use Jell-O instead of unflavored gelatin?
No. Jell-O and other flavored gelatin mixes already contain sugar, coloring, and flavoring, so they would change both the taste and the sweetness. You need plain, unflavored powdered gelatin, like Knox. The 14 g (½ oz) in this recipe is exactly 2 envelopes, or about 4½ tsp if you buy it in a jar.
How do I know if my pumpkin puree is thick enough?
Canned pure pumpkin is almost always thick enough to use as is. For homemade, drag a spatula across the bottom of the skillet: if the trail takes a second to close, it is ready. Another quick check is to put a little on a spoon and turn it upside down: thick puree clings, watery puree slides off.
Can I use store-brand cream cheese?
Yes, we use it often and it works just as well. What matters is that it is full-fat and comes in a block. Avoid spreadable tub cream cheese and reduced-fat versions: both have more water and less fat, and the cheesecake loses exactly what makes it creamy.
Why is my filling lumpy?
It is almost always one of three things. The most common is over-whipped cream: folded into the cold filling, it breaks and leaves little lumps of butter. The second is cream cheese that was too cold and never beat smooth. The third is gelatin poured straight into the cold filling without tempering it first, which leaves rubbery strands rather than round lumps.
Why didn’t my cheesecake set?
The first thing to check is the puree: if it was watery, the gelatin had to set much more liquid than it should, and the center stays soft. Next, time: before 6 hours the center is not ready, even if the edges look done. Finally, the gelatin: if it boiled while melting, it lost its setting power. If the center ripples instead of wobbling as one piece, put it back in the fridge for a few more hours.
Can I use a graham cracker crust instead?
Yes. Replace the 180 g (2 cups) of toasted oat flour with 200 g of graham cracker crumbs, about 1¾ cups, and keep the 115 g (½ cup) of butter. Gingersnaps or Oreos work the same way. You lose the toasted flavor, which we love, but the filling works on any classic crust.
Is this pumpkin cheesecake gluten-free?
It can be. The crust is made with oat flour instead of graham crackers, so if you use certified gluten-free oat flour, the whole cheesecake is gluten-free. Regular oats can be cross-contaminated with wheat, which is why the certified kind matters.
Can I use pumpkin pie spice?
Yes. The ginger, nutmeg, and cloves in this recipe are exactly what goes into pumpkin pie spice, so you can replace those three with 2 tsp of the blend. Keep the cinnamon separate, at 8 g (1 tbsp), because it is the main spice and the blend alone would not give you enough of it.
Can I make it with less sugar?
Yes. There are 150 g (¾ cup) of sugar in total between the crust and the filling, about 12 g per slice. You can reduce the filling from 100 g (½ cup) to 70 g (⅓ cup) without hurting the texture, because here sugar does not provide structure. Leave the crust as is, since the sugar helps it hold together.
How far ahead can I make it?
Up to two days before you serve it, and it actually needs to be made at least the night before. It keeps well for three days in the fridge, which makes it a great make-ahead dessert for Thanksgiving or any fall gathering. Keep it in the springform pan until you are ready to serve, and slice it at the last minute.
How long does it last in the fridge?
It keeps well for 3 days covered, and up to 4 with a slightly firmer texture. From the second day the surface dries out a little, so cover it well and slice it right before serving.
Can I freeze no-bake pumpkin cheesecake?
We have not tried it with this recipe yet. Because it has gelatin and quite a lot of pumpkin puree, there is a chance it releases some water as it thaws, so we would rather not recommend it until we have tested it ourselves. As soon as we do, we will update this answer. If you try it before we do, let us know in the comments 😊
Does it really not need an oven?
The cheesecake itself never goes in the oven: it sets in the fridge. If you use canned pumpkin, you will not turn the oven on at all. If you make your own puree, you will roast the pumpkin, which is what gives it the best flavor.
Made This Recipe or Have a Question?
Any questions before you start? Ask us down below and we’ll get back to you. And if you’ve already made it, tell us how it turned out or leave us a rating: it really helps more people find the recipe 😊
Rate this recipe ⭐️